Category Archives: Eggless

Daikon Radish Salad with Coconut (Koshimbir)

Standard

040814hero
Hello! This post features daikon radish that we harvested yesterday at Muir Ranch. The radish is a bit smaller than usually found in the store, but tastes so yummy. It’s funny that one is spicier than the other. When shopping for daikon, look for firm specimens that aren’t too big – stick to less than 12″. I like to see some leaves growing on the end (these can be cooked too – I’ll try to post some recipes for these later) but it’s not necessary. If you do have greens growing on the end, trim them when you get home if you won’t be using the radish in the next day or two. This will keep the radish fresh longer. This goes for beets and carrots too.

040814ingred

The recipe here is based on a the Radish Koshimbir recipe from Rasachandrika, a wonderful and unique Konkani Indian cookbook. I tweaked it a bit by leaving out the typical green chilis and adding cilantro. Koshimbir is made with many other veggies such as carrots, beets and cabbage. Give it a try on a hot day, it’s refreshing!

Daikon Radish Salad with Coconut (Koshimbir)

1 medium daikon radish (about 1 cup shredded)
1/4 cup cilantro leaves, finely chopped
1/4 cup coconut (fresh-frozen or desiccated)
salt to taste
juice of 1/2 small lemon
1 tsp coconut oil (or other oil)
1 tsp mustard seeds

Wash and trim the tip of the radish. Peel the radish and grate into a bowl. Toss in the cilantro, coconut, salt and lemon and stir well. Set aside. Heat the coconut oil in the small pan over medium. When hot, add the mustard seeds. Once they start popping, turn off the heat and immediately pour over the salad.

040814close


Tempeh and Portabella Salad Sandwich

Standard

040314

Hello- Super quick post today for a super quick but so delicious sandwich. This is my second post in a row on tempeh. Well, I had a half package leftover from a few days ago that I need to use. If you aren’t familiar with tempeh, you should really check it out. It’s high-protein, inexpensive and being a soy product, pretty much takes on the flavors that you add to it. Trader Joe’s has their own version of it that I highly recommend.

I had some nice local sourdough bread at home so a sandwich was calling my name. Though I’m not a big mayo fan, I used Vegenaise which is a vegan mayo substitute. This was used to bind the tempeh and mushroom mixture and doesn’t really enhance the taste much. If you don’t have it, you could puree some silken tofu with a bit of lemon juice and salt or even use mustard instead. You can change up the bread as you like.

Tempeh and Portabella Salad Sandwich

1/2 package tempeh (any kind)
1 large portabella mushroom, sliced thinly
1/2 medium size onion, sliced
2 tsp oil
1 tsp garlic powder (or fresh garlic)
2 tsp Old Bay Seasoning or other seasoning of your choice
pinch of dried oregano
salt to taste
1 tbsp Vegenaise or other binder
4 lettuce leaves
2 slices of sourdough bread
1 tbsp Dijon mustard

Chop the tempeh into small chunks or crumble it with your hands and set aside. Heat a pan over medium heat and add oil when it gets hot. Add the mushroom pieces and onions and stir occasionally, allowing them to cook until almost done. Then add the tempeh pieces, garlic, seasoning, oregano and salt and a bit more oil if necessary. Allow to cook until the mushroom and onions are starting to brown and cook through. The tempeh doesn’t have to “cook” but you want to get it starting to brown. When it’s done cooking, remove the mixture to a bowl to cool for a few minutes.

While waiting for the mixture to cool, toast your bread. When it comes out, slather with mustard and put on a plate. Tear some lettuce leaves and place on both pieces of bread. Now go back to the tempeh mix – add the vegenaise and mix well. Taste for seasoning and put on top of your lettuce/toast. Place the pieces together and enjoy!


Tempeh Potato Pepper Curry with Pickled Onions

Standard

033114

Hello! It’s been a long time since my last post. I have been very busy with garden things and kid & school things. I have been tweeting a bit, in case you want to follow me there just look for thisspicylife… I usually re-tweet interesting nutrition articles, garden info and other inspiring stuff.

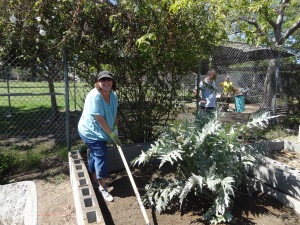
Yesterday I hosted a huge garden work day at our school garden as part of an Eagle Scout Project. We worked pretty much all day rebuilding raised beds and moving soil into the new beds. We had a lot of help from a local Boy Scout Troop #127 and our school parents and community volunteers. It was such a great day with beautiful weather and nice people. See the end of this post for some pics of our garden remodel.

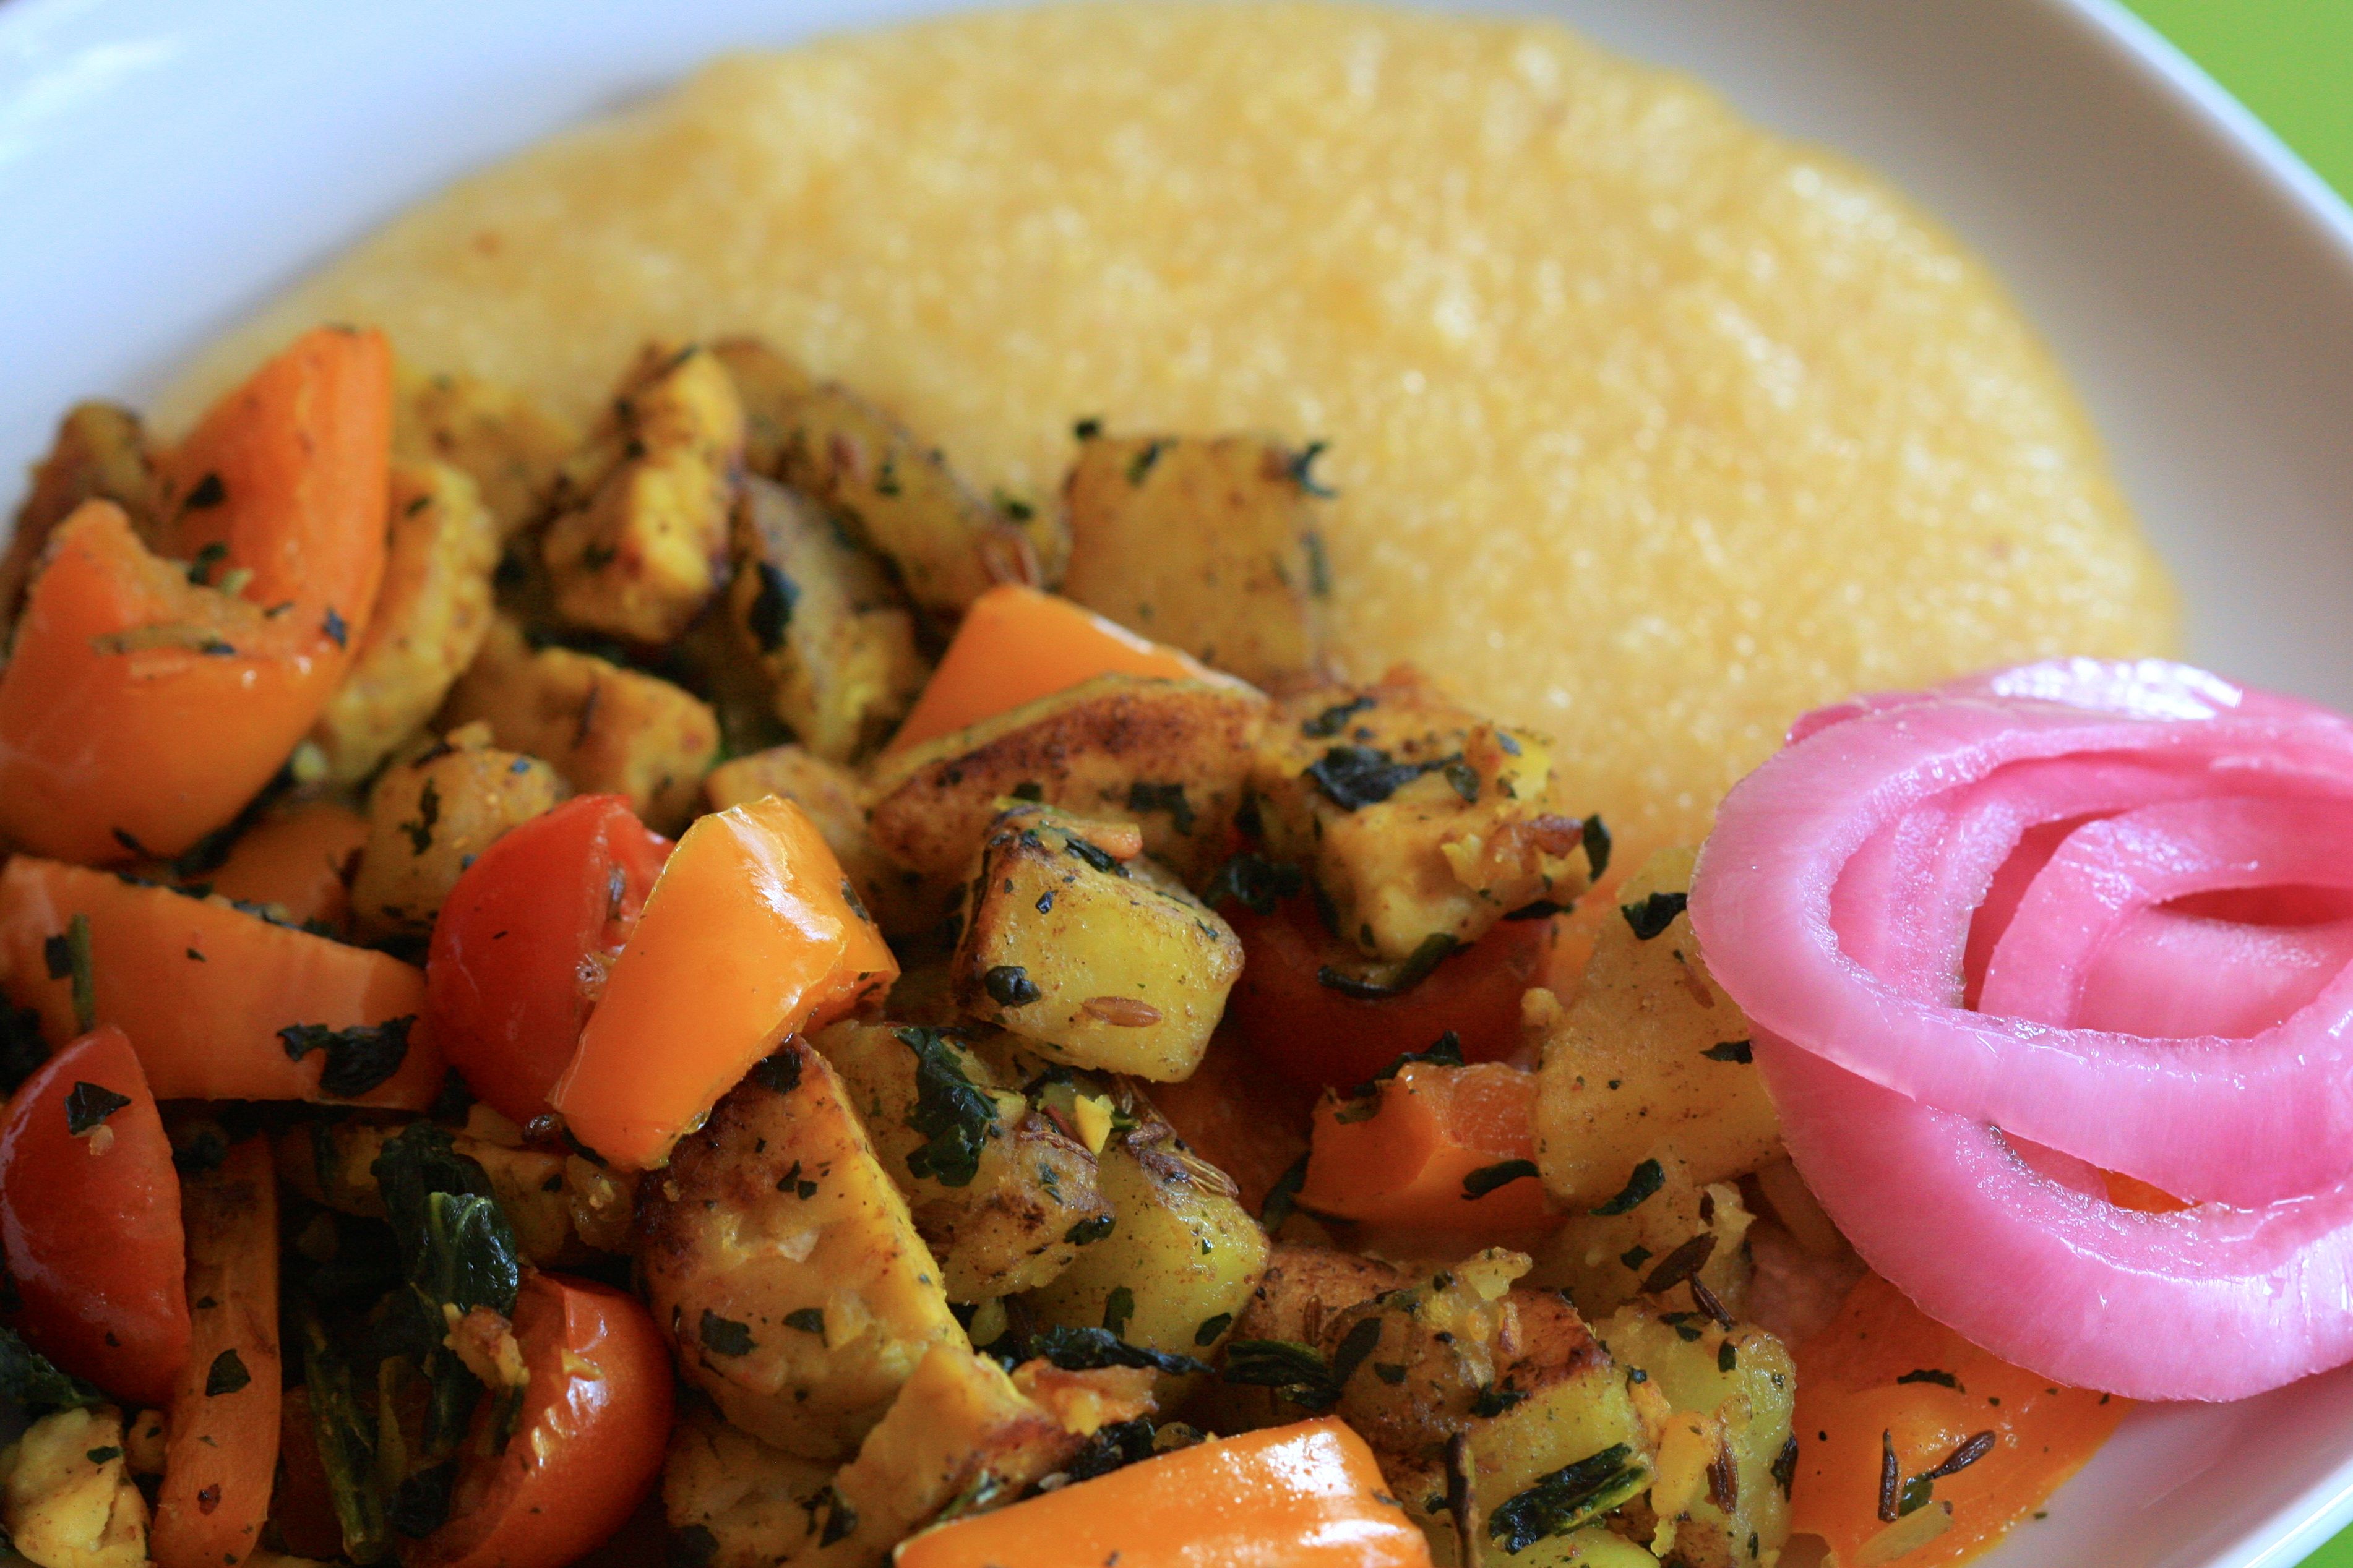
I really worked up an appetite because today I was ready for a rather substantial (for me) breakfast. It turned into brunch by the time I got it made and ready to eat, though this is a pretty quick dish to make. We had some leftover pickled onions from the weekend, so added these to the plate along with some yummy grits seasoned with nutritional yeast. The leftovers will be made into burritos. It was the perfect addition to this non-spicy curry. If you want the onions, you should plan ahead. Or just make a batch and find ways to use them! They are a pretty pink color and delicious (if you like onions). Here is the tempeh recipe:

Tempeh Potato Pepper Curry with Pickled Onions (Serves 4)

1/2 package of tempeh, cut in bite-sized pieces
1 large baking potato, cut in bite-sized pieces
1 orange bell pepper (or other color), cut in bite-sized pieces
1/2 cup finely chopped kale
2 cloves garlic, minced
2 tbsp oil
1 tsp cumin seeds
1/2 tsp turmeric
2 tsp coriander powder
1 tsp cayenne pepper (optional, to taste)
pinch of garam masala (optional)
salt to taste

Heat a skillet over medium heat. Add the oil and allow to heat a bit before adding the cumin seeds. Once the cumin seeds start to toast, add the potato pieces and a bit of salt, stirring the potatoes to coat with the oil. Cover with a lid and allow the potatoes to cook, stirring occasionally. When the potatoes are almost cooked through, sprinkle with the turmeric, coriander powder and cayenne pepper and stir well. Add the tempeh, pepper, kale and garlic. Continue cooking and stir frequently until the tempeh is heated and the pepper is cooked to your liking. This should take just 3 to 5 minutes. Turn off the heat and add the pinch of garam masala and additional salt to taste. Serve with pickled onions over grits, rice or with bread of your choice.

Pickled Onions

1 red onion
1/2 cup of vinegar (any kind you like)
1/2 cup of water
pinch of salt

Peel the onion and cut in rings. Loosen the rings and place the rings in a non-reactive bowl. Sprinkle a pinch of salt over the onion and add the vinegar (we used white vinegar) and water. Allow to sit for an hour or up to two days before using. These can be used in sandwiches, as part of an appetizer tray with other veggies, on pizza, or just on the side of any spicy curry. The longer they pickle, the better they taste. Just keep ’em in the fridge.

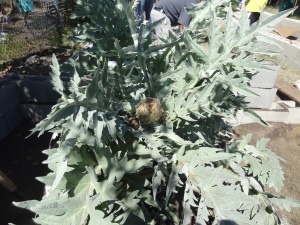
Here are some pics of our garden remodel:

Rebuilding the raised beds with cinder blocks…Boy Scouts in yellow shirts. The blocks will get painted later by the students.

DSC04026


Some artichokes growing in the garden… can’t wait to harvest!

DSC04035


One of our hard-working volunteers!

DSC04034


Pink Heart-Shaped Puris for Valentine’s Day

Standard

Happy Valentine’s Day! I’m reposting a recipe from several years ago. I think my photos have improved over the years but you can still see in this pic the heart-shaped bread tinged pink with beet juice. These are a yummy snack or meal for kids and adults served with potato curry or another vegetable curry. For the past year or so I have been using whole wheat pastry flour instead of the Indian atta flour. My mother-in-law and I compared and tested several types of common American flours and determined that this was a perfect substitute.

Valentine’s Puri-Bhaji

Valentine’s Puris (serves 4)

  • 3 cups of atta flour (or whole wheat pastry flour)
  • 1.5 tsp salt
  • 1/2 cup beet juice*
  • additional water to make a stiff dough
  • Oil for deep frying

Mix flour and salt together in a large bowl. Add 1/2 cup of beet juice and start kneading the mixture into a stiff dough. Keep adding water until all the flour is incorporated. Knead by hand for 5 minutes, cover and let rest for at least 1/2 hour. Please note that puri dough must be very stiff to puff up successfully when fried.

Heat the oil to 350F degrees. Take a small piece of dough about the size of a golf ball and roll it out on a floured surface to about 1/4″ thick. Use your heart-shaped (or other) cookie cutter to cut out the puris. One at a time, slide a puri into the heated oil. It will sink at first. With a slotted spoon press gently on the top of the puri until it comes up and starts to puff. Allow it to cook while you baste the top of the puri with oil from the sides for about 1 minute. Then flip it over and allow it to cook for another minute. Remove and drain on paper.

You can line a large bowl with paper and stand the puris up on their sides to allow better oil-drainage. Once the puris start to cool off the puff will disappear. This is normal. However, it’s best to eat the puris while hot and fresh. Also, keep in mind that you probably won’t have a 100% success rate on the puffing up – I think 80% is pretty good but just keep trying! The puris that don’t puff up are still delicious to eat!

*I made beet juice by putting one cooked beet in my blender and adding a little more than a 1/2 cup of water. Blend on high and strain.

Cutlets Meet Vada Pav Sliders (Indian Potato Burgers)

Standard

021314e

There is a delicious Indian treat called “Vada Pav” that is a round deep-fried potato ball served on a bun with garlic chutney. It is so good to eat with the crispy chickpea flour coating outside and the soft flavorful potatoes inside. I decided to try a  healthy twist on this dish, though I would never turn down the original! I’m not trying to improve it but rather make it a bit more healthy for everyday eating. Not that I’m suggesting that this be eaten everyday! With the addition of cooked mung beans, it’s more of a cross between the Vada Pav and a cutlet.

This is a recipe that calls for a few Indian ingredients. If you don’t have them, then come up with your own spice mix. I think a southwest version would be very good. Hmm… that’s definitely a future experiment! The traditional version of Vada Pav features garlic chutney. It gives it a delicious, spicy flavor. However, you don’t need the garlic chutney to complete this dish – sub in some spicy ketchup or other chutney or just dress it up as you would  a burger. You won’t be disappointed!

Healthy Twist on Vada Pav (Indian Potato Burgers) (Makes approx. 9 patties)

1 cup mung beans, cooked
1 potato, boiled or steamed, mashed and cooled (about 1 cup of potato)
2 tsp oil
1 tsp mustard seeds
pinch of hing
a few curry leaves, chopped
1/2 cup of onions, finely chopped
1 tsp garlic paste
2 tsp ginger paste
1 tsp of cayenne pepper
salt to taste
1/4 cup chickpea flour (besan) plus additional flour for coating
1/8 – 1/4 cup oil for pan frying
small round hamburger buns
1/2 cup dry garlic chutney (or to taste)

In a large bowl, mix together the mung beans and potato. In a small pan, heat the oil over medium heat. Add the mustard seeds, hing and curry leaves. When the mustard seeds start to pop, add the onion and allow to cook for a few minutes, stirring. Then add the garlic and ginger paste and cayenne. Allow to cook for a minute or until the garlic is cooked to your liking. Remove from heat and pour this in the mung bean mixture. Add the salt and 1/4 cup of chickpea flour and mash everything together until well combined. Taste for salt and adjust if necessary.When the mixture is ready,  roll it into large rounds approx. 2″ in diameter. Set aside until all are rolled out. Place the additional chickpea flour on a plate and roll each ball in the chickpea flour, dusting the outside with the flour.

021314a

Heat a skillet over medium heat and add a tbsp or 2 of oil. When the oil is heated, place a few of the balls in the oil, pressing down slightly on the top to flatten a little.

021314b

Once the bottom is nicely browned, flip over each ball and cook on the other side, flattening a bit more.

021314c

Once browned on the 2nd side, remove from the oil to a plate or paper. Repeat frying until all of the balls are cooked.

021314d

If using the garlic chutney, spread a nice layer on the bottom bun, place the patty on the bun, top with sliced onion. Or skip the chutney and use condiments of your choice. Enjoy!

021314hero

Coconut & Peanut Poha

Standard

021114poha

Have you ever been searching for something in your pantry or kitchen only to find a whole package of something else? And then realize that you really should use it soon before it expires/stales/etc.? That’s what happened today when I found a very large bag of thick poha. It was a pleasant surprise since my hubby and I both love poha. In case you don’ t know about this unusual ingredient, poha is also called “beaten rice” and “flattened rice”. It’s basically a dried flattened raw rice product that can be used raw or cooked. Poha is used in Indian snacks, breakfasts, lunches and light meals in both savory and sweet preparations. It can be added to some dosa batters to thicken the batter. It’s an ingredient that is easy to work with and keeps a long time. Pick up a package next time you are in an Asian or Indian market! A few years ago I posted a recipe for the thin variety of poha.

Here’s a simple recipe I made for lunch today that turned much better than I expected. I started looking in a few cookbooks for ideas, but didn’t really find anything that seemed new. My usual go-to recipe for thick poha uses onion and potato. That seemed too heavy for today. Therefore, I started out with a very basic recipe but tweaked it a bit by adding peanuts (for protein), cilantro for more flavor and lots of coconut. It turned out light, spicy and very tasty. I hope you try it too!

Coconut & Peanut Poha (Serves 4)

4 cups of thick poha
4 tbsp coconut oil
1/2 cup raw peanuts (or roasted peanuts)
2 tsp salt or to taste
1 1/2 tsp mustard seeds
2 tsp urad dal
1/2 tsp cumin seeds
2 dried red chili peppers, broken
1 green chili peppers, sliced
4 tbsp water
sprig of curry leaves
1/2 cup fresh or frozen (not sweet!) coconut flakes
cilantro – about 1/2 cup chopped
lemon slices

The poha is a little tricky. It’s easy to make it too soft so be careful. You don’t want it too soft and soggy nor do you want it “al dente”: Place the poha in a large colander or strainer and place in the sink. Quickly wash the poha with water running, using your hand to fluff it and get each grain wet. Let the water drain immediately. Let sit for a few minutes. It should have softened without any additional water. Taste a bite to see if it’s soft enough for you. When it’s ready, place it in a large bowl and set aside.

Heat a medium-sized pan of your choice over medium heat. Add the coconut oil and raw peanuts (if using roasted peanuts, skip this step). Allow the peanuts to fry a bit until they are browned. Once done, immediately remove from the oil to a plate (leaving the oil in the pan), sprinkle with a bit of salt and allow to cool.

Now add the mustard seeds to the oil. Once popping, add the urad dal, cumin seeds, red chili peppers, green chili peppers and curry leaves. Carefully add the water and allow it to cook off. This will make the urad dal soft. When the water is evaporated, pour this seasoning over the washed poha.

Now toss in the peanuts, coconut flakes and cilantro. Add salt to taste. Stir gently but well. If the poha is a bit too wet it may stick together. If that happens, just stir as gently as possible, breaking up pieces as you do so. Can you tell that I have experience at making the poha too soft? It’s okay if it happens, it will still taste good! Serve with some yummy garlic pickle and lemon slices to squeeze over.

Refreshing Salad of Green Mango & Cukes

Standard

020514hero

Hi! Today’s quick post is a simple mango and cucumber salad I made at lunch. I served it alongside some puliogare (tamarind rice) and it was fast and tasty combination. I had a slightly over-ripe green (sour) mango in the fridge. I actually saw a delicious looking green mango salad on another food blog yesterday (she has lots of great mango recipes). I got the inspiration to use mango in a salad today. Normally I make pickle with the green mangos or chop them up for bhel puri. Just didn’t get around to it, but I’m happy to say here is a great alternative!

The green mangos are smaller, firmer and much more sour than the usual mangos we get in US stores. You can find them in Asian markets and Indian markets. I have even seen them in a Middle Eastern market. If you don’t have “chat masala”, you can add cumin powder and a bit extra lemon. It isn’t the same, but it will still make a nice salad.

Refreshing Salad of Green Mango & Cukes

1 green mango (sour)
2 Persian cucumbers
1/4 cup of finely chopped onion
1/2 to 1 whole green chili pepper, finely chopped
1.5 tsp chat masala (or cumin powder)
salt to taste
juice of 1/2 lemon
1/8 of cup of chopped cilantro

Cut the mango and cucumbers into bite-sized pieces and place in a bowl. Add the onions, pepper, masala and salt. Stir well. Add 1/2 of the lemon juice and stir. Taste and add more juice and salt if necessary. Sprinkle the cilantro over the top. Serve chilled.

020514close

Mouth-watering Mushroom, Kale & Tofu Scramble & Grits

Standard

020414hero

Hello! I’m back to the Indian-inspired cooking for a bit. It’s “cold” here in S. Cali this week requiring some spicy comfort food. Yes, it’s in the high 50’s to low 60’s, but what can I say? This morning I threw together a quick tofu scramble while the grits were gurgling on the stove. I love mushrooms and when I’m feeling a bit under the weather they always seem to bring me back around. For some extra nutrients, I threw in kale and tomatoes. The tomatoes were just cooked enough to be soft but still pop a little in your mouth. Hence, the “mouth-watering” description. I ate these served over yellow corn grits with a few dashes of super-spicy Marie Sharp’s Belizean Heat. I think grits have to be eaten with a bit of hot sauce. Just goes hand-in-hand.

This is an easier recipe than my scrambled tofu with spinach since I don’t use onion and garlic. It also takes less time since you don’t have to wait on the onion to cook. The only thing you have to mess with is chopping the mushrooms (and kale if using fresh). I have a bag of organic kale in the freezer. It’s handy for quick meals where I really need some greens. The kale cooks faster than fresh since the ice crystals have broken it down a bit.

If you don’t have all of the spices, run out to the store and get them! What are you waiting for? Just kidding… you can add whatever you like – just don’t use too much of any one thing so you keep a balanced flavor. Of course, you could go the Mexican or Italian route with the spices too. Tomorrow I will use the leftovers to make tacos with corn tortillas. Just throw on some spicy salsa, fresh shredded cabbage and another nice, healthy meal is ready! Here is today’s version of the tofu scramble…

Mouth-watering Mushroom, Kale & Tofu Scramble & Grits (serves 2 – 4)

1 pkg. firm tofu (press out the water for 10 – 15 minutes)
1 lb. of portabella or other mushrooms, cleaned and chopped
1 cup of kale, frozen or washed and chopped
2+ tbsp oil
2 tsp of black salt (or to taste)
1 tsp cumin seed
1 tsp turmeric
1 tsp cumin powder
2 tsp coriander
1 tsp cayenne pepper (or to taste)
2 tsp garam masala (optional)
1 cup cherry tomatoes
2 tbsp chopped cilantro
hot sauce to taste
3 cups cooked grits

Heat up your trusty cast-iron skillet (or other large skillet) to medium. When it’s really hot, add your mushrooms and let them cook for a minute or two. Stir and add a pinch of salt over them. As they start cooking down and releasing their water, you can add the oil and kale. After about two minutes, crumble the tofu with your hands into the skillet. There should be bite-sized pieces and some smaller pieces. Add a bit more oil if necessary to keep it from sticking. Stir and then add all of the spices and stir again to get the spices incorporated. Reduce the heat to low. Allow to cook, stirring only once in while so that the tofu starts to get slightly brown and crispy in spots. After approximately 5 – 8 minutes, make a little space in the middle of the pan by moving everything else to the sides. Toss the tomatoes in the center and let everything cook for about 3 minutes. Stir and turn off the heat. Keep in mind that cooking times will vary depending on the type of tofu you are using, how much water is in it, if you are using cast-iron or not… Spoon over hot grits. Serve with fresh cilantro and hot sauce.

020414lcose

Sid’s Everyday Pancakes – Kid in the Kitch!

Standard

012914hero

Today my son woke up early and wanted to help make the pancakes. He absolutely loves cooking and helping in the kitchen. As an eight year old, there are certain things he can’t do or that I’m nervous about him doing safely. However, he listens well, he’s calm and follows directions. That makes it easier to teach him how to cook.

We make pancakes almost everyday. But we make fast and easy pancakes. I use a mix from Trader Joe’s – it’s one of the few convenience foods that I rely on (btw, it has buttermilk in the mix so it isn’t vegan). My kids love it and I think it’s healthier than most other mixes I’ve looked at. Of course, you can make your own mix (which I aspire to, but it’s low on my list at this point)!

012914ingred

Since we don’t  do eggs in our house, I use sourdough starter for leavening the pancake batter. It works great and doesn’t give much of a sour flavor when it’s used right away. If you aren’t familiar with sourdough starter and you like to bake, you should check it out! It’s awesome but kind of like having a pet. It has to be fed and nurtured. You can’t stick it in the cupboard and forget about it for a month or it will die. There are places to get the starter mix (King Arthur Flour is a great source), but I think it’s best to get it from someone you know. If you don’t have sourdough starter, you can sub a flax egg (1 tbsp ground flax seeds mixed with 3 tbsp water).

Without further delay, here’s Sid’s blog debut…

Sid’s Everyday Pancakes (makes enough pancakes for 1 or 2 kids)

2 tbsp sourdough starter or flax egg
1 cup Trader Joe’s Multigrain Baking and Pancake Mix
approx. 1/2 cup almond milk or other milk

Place the sourdough starter or flax egg in a mixing bowl. (Then feed your sourdough – here is Sid feeding it with more flour and water.)

012914feedthestarter

Add the pancake mix and stir a bit.

012914stir

Slowly add the almond milk and continue to mix and add milk until the mix is pourable but not too liquid.

012914almondmilkHere is the final batter consistency:

012914spoon

Now pour the batter by the spoonful onto a heated cast iron griddle or other skillet (action shot):

012914cooking

Flip the pancakes over when they start to get bubbles on the top (great job, Sid!):

012914flip

Serve!012914thumbsup

Mushroom “Bacon” and Avocado Sandwich

Standard

012814sandwich3

Hello! This is a super quick post for a super quick sandwich. I have been racing the clock all morning trying to get errands and chores done. My friend S and I are meeting for a lunch run and I had to eat properly before heading out. This sandwich is quick, light and satisfying. The main thing that takes a bit of time to prepare is the “bacon”. With my quick version, it takes only 10 minutes (no marinating this time). I hope you try it out!

Mushroom “Bacon” and Avocado Sandwich

1 lb. mushrooms, crimini or button or portabella
a few pinches salt
1 tbsp oil (grape seed, olive, etc.)
1 tbsp tamari or soy sauce
dash or two of garlic powder
dash or two smoked seasoning or liquid smoke
1 tbsp maple syrup
2 slices bread
1 tbsp vegenaise or mayo or your choice
2 lettuce leaves, washed and dried
1/4 avocado, sliced
1 tomato, sliced
salt and pepper to taste

Clean and slice the mushrooms. Place the 1 tbsp oil and half the mushrooms in a heated cast iron skillet in a single layer, sprinkling with a pinch of salt:

012814mushroom

Let the mushrooms cook until lightly browned on the first side. Scoop them to the side and repeat with the other half of the mushrooms. When these are brown on the bottom, stir together and sauté for a minute or two until they are cooked and a bit dry. Sprinkle over the mushrooms: tamari, garlic powder, smoke ingredient and maple syrup. Stir and turn off heat.

012814mushroom2

Toast the bread, if you like. Slather some mayo of your choice on one slice and top with the tomato. On the other slice layer the avocado. Sprinkle with salt and pepper to taste. Top with lettuce and “bacon”. Press slices together and eat. Enjoy!

012814sandwich1